Getting tattooed is one of those experiences that’s hard to describe until you’ve been through it. It’s personal. It’s physical. And yes, it hurts. But how much it hurts depends almost entirely on where the needle hits. That’s why a tattoo pain chart organized by placement is one of the most searched topics among first-timers and seasoned collectors alike. Nearly 32% of Americans now have at least one tattoo, and that number keeps climbing. The question isn’t really whether tattoos hurt. They do. The real question is how much, where, and what you can do about it. This guide breaks down pain levels by body part, explains the factors that change your experience, and gives you honest prep advice so you can walk into your appointment ready. No sugarcoating. Just the truth from people who’ve been on both sides of the needle.
What to Expect During Your First Tattoo
Your first session is a head trip. You’ve been thinking about this piece for weeks, maybe months. You’ve scrolled through a thousand reference images. And now you’re in the chair, hearing the machine buzz, watching the artist dip into ink. The anticipation is almost always worse than the reality.
Most people describe the initial contact as a sharp, hot scratch. Your body tenses. Your brain fires off alarm signals. But within a few minutes, something shifts. Your nervous system starts to adjust. The pain doesn’t vanish, but it dulls into something manageable. Think of it like jumping into cold water: the shock fades.
That said, the sensation changes depending on the spot. A fine line on your forearm feels nothing like heavy shading on your ribs. And a two-hour session hits different than a six-hour marathon. Knowing what sensations to expect helps you stay calm and breathe through the rough patches.
The Difference Between Scratching and Burning Sensations
Two main types of pain show up during a tattoo. The first is a sharp, scratching feeling. This happens during line work, when the needle punctures skin in quick, precise strokes. It feels like someone dragging a cat’s claw across a sunburn. Intense but brief.
The second is a burning or stinging sensation. This comes with shading and color packing. The artist goes over the same area repeatedly, and your skin gets irritated. It builds slowly into a hot, raw ache. Some people handle lines fine but struggle with shading. Others are the opposite.
There’s also a vibrating buzz that happens over bony areas. Your skeleton conducts the needle’s vibration, and it can feel deeply uncomfortable. Not exactly painful, but unsettling. You’ll notice this on spots like the collarbone, elbow, or ankle.
Why Everyone Experiences Pain Differently
Pain tolerance isn’t one-size-fits-all. Your genetics, stress levels, sleep quality, and even your hormonal cycle all play a role. Someone who slept eight hours and ate a solid meal will handle pain better than someone who showed up hungover on an empty stomach.
Skin thickness matters too. Areas with more fat and muscle provide a natural cushion. Thin skin over bone or nerve clusters amplifies every poke. Age, hydration, and even your mental state that day all factor in. Two people can get the exact same tattoo in the exact same spot and rate the pain completely differently.
This is why experienced artists tell you not to compare your experience to someone else’s. Your body is your body. Respect it.
Tattoo Pain Chart: Most and Least Painful Spots
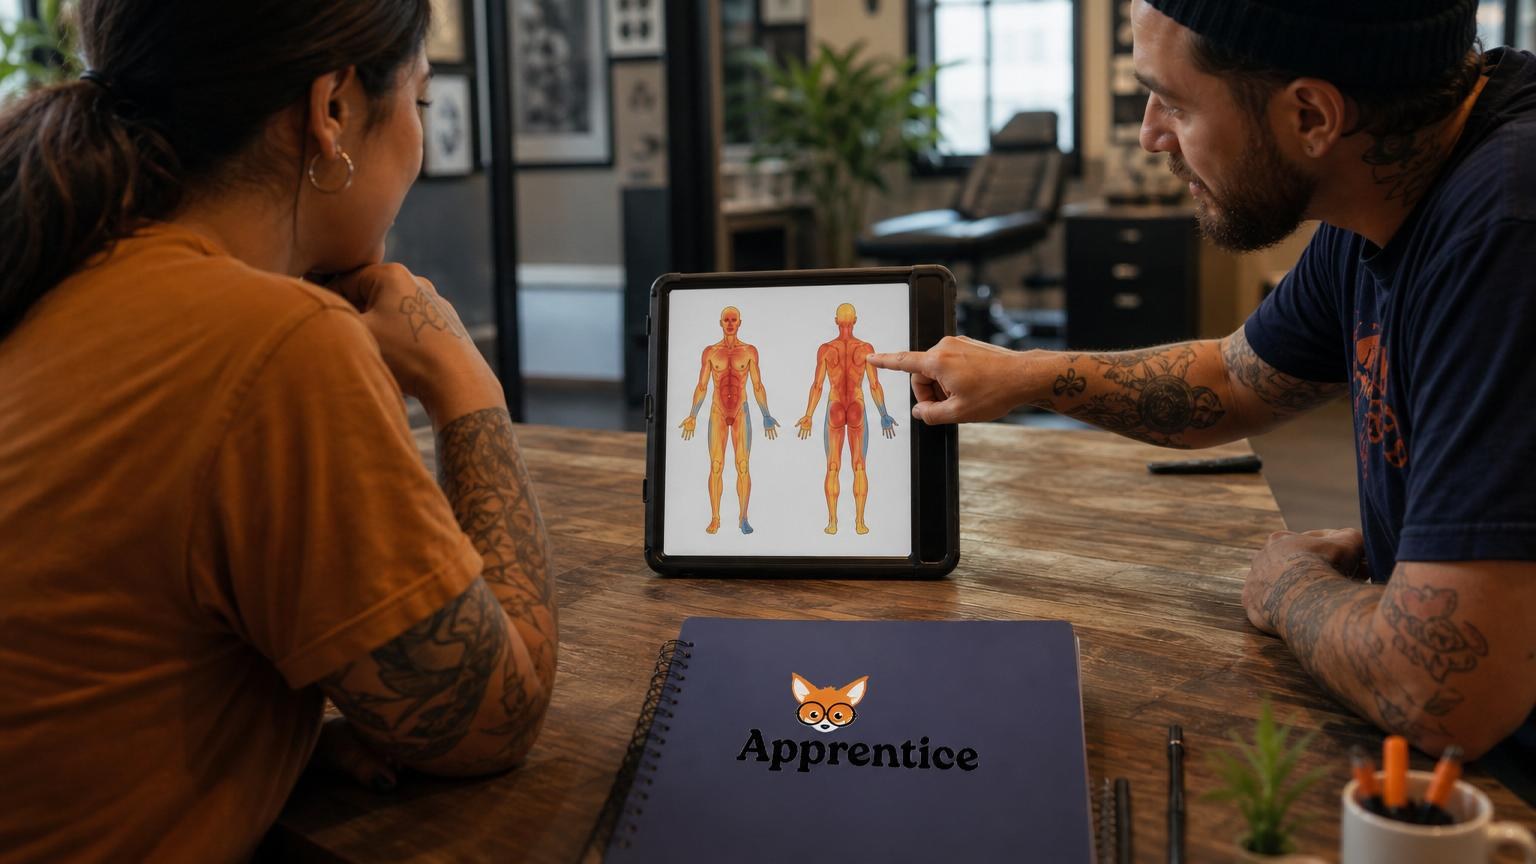
A pain chart by body placement gives you a general roadmap. It’s not gospel. But it’s based on thousands of collective experiences from artists and clients. If you want to explore it visually, our interactive tattoo pain chart rates every placement on a 1-10 scale so you can compare spots before you commit.
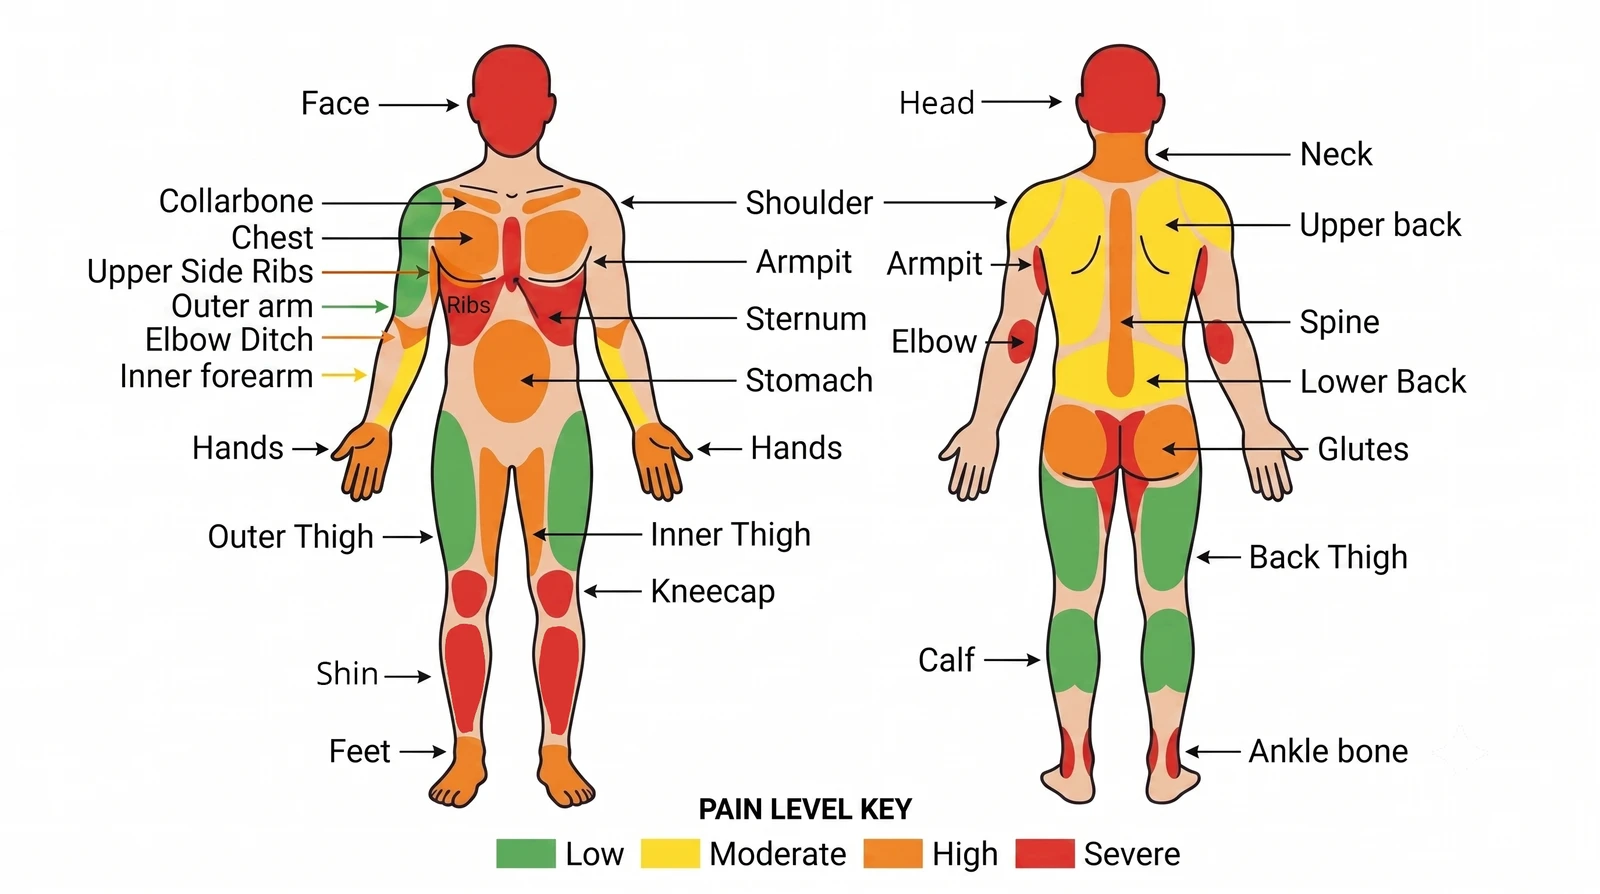 The general consensus among tattoo professionals maps pain on a scale from mild discomfort to genuinely brutal. Here’s how the body breaks down.
High Sensitivity Areas: Ribs, Spine, and Joints
These are the spots that make grown adults tap out. The ribs sit right at the top of most pain charts. There’s almost no fat or muscle between the needle and your bones. Every breath moves the skin, which adds a whole extra layer of misery. Rib tattoos are beautiful. They also earn every ounce of respect.
The spine is another beast. Nerve endings run dense along the vertebral column, and the vibration from the machine travels straight through bone. Many clients describe it as an electric, buzzing pain that radiates outward.
Joints bring their own problems. Elbows, kneecaps, and ankles have thin, tight skin stretched over bone. The inner elbow (the ditch) is especially rough because of nerve density. Same goes for the back of the knee. These spots are consistently rated among the most painful places to get inked.
Other high-pain zones include:
- Sternum and chest plate: Thin skin, lots of bone.
- Feet and toes: Nerve-rich, minimal padding.
- Hands and fingers: Fast healing but brutal during the session.
- Neck and throat: Sensitive skin, hard to stay still.
- Inner bicep near the armpit: Surprisingly painful for most people.
Moderate Discomfort: Torso and Inner Limbs
The middle of the pain spectrum covers a lot of real estate. Your stomach, lower back, and inner forearms fall here. These areas have enough tissue to cushion the needle but not enough to make it comfortable.
The stomach is tricky. It’s fleshy, which helps, but the skin stretches and moves. Breathing causes motion. And the closer you get to the hip bones or the belly button, the worse it gets. Lower back tattoos are similar: manageable in the center, sharper near the spine.
Inner forearms and inner thighs sit in moderate territory too. The skin is thinner than the outer surfaces, and there are more nerve endings. You’ll feel it, but most people handle these spots without major issues. Expect a steady, warm sting that builds over time.
The chest (away from the sternum) is also moderate. Pectoral muscle provides padding, but the area near the collarbone ramps up fast.
Low Pain Zones: Outer Arms and Thighs
If you want your first tattoo to be as painless as possible, aim for the outer upper arm or the outer thigh. These are the sweet spots. Thick skin, solid muscle underneath, and relatively few nerve endings make them the easiest places to sit through.
The outer forearm is another popular first-tattoo spot. It’s visible, easy to heal, and ranks low on most pain charts. The calf is similar: meaty, forgiving, and a great canvas for larger pieces.
Your upper back (the flat area between the shoulder blades) is also surprisingly tolerable. The trapezius muscle absorbs a lot of the impact. Just avoid drifting too close to the spine.
A quick low-pain summary:
- Outer upper arm and shoulder: The classic starter spot.
- Outer thigh: Big canvas, minimal pain.
- Calf: Thick muscle, easy to sit for.
- Upper back: Comfortable for most people.
- Forearm (outer): Popular and manageable.
Factors That Influence Your Pain Level
Placement is the biggest variable. But it’s not the only one. Several other factors can push your experience from “totally fine” to “I need a break.”
Session Length and Design Complexity
A one-hour session is a completely different animal than a five-hour one. Your body produces adrenaline and endorphins early on, which naturally dull pain. But those chemicals burn off. After about two to three hours, fatigue sets in. Your skin gets inflamed. Your pain tolerance drops.
Big pieces with heavy shading or color saturation require more passes over the same skin. That repeated trauma compounds. A simple black outline on your forearm might rate a 3 out of 10. A fully packed color sleeve session pushing past four hours might hit a 7 or 8 in the same general area.
Design complexity also affects how long you’re in the chair. Fine detail work requires precision, which means the artist moves slower. Geometric patterns with long straight lines demand you stay perfectly still. That mental strain adds to the physical discomfort.
If you’re planning a large piece, talk to your artist about splitting it into multiple sessions. Your skin and your sanity will thank you.
Artist Technique and Equipment
Not all tattoo machines feel the same. A coil machine hits differently than a rotary pen. Cartridge needle configurations vary too. A tight liner grouping feels sharper than a loose magnum shader. Your artist’s hand speed, depth, and pressure all change the sensation.
An experienced artist with a light hand can make a painful spot tolerable. A heavy-handed beginner can make an easy spot miserable. This is one reason choosing your artist matters as much as choosing your design.
The tattoo industry continues to grow, and equipment keeps improving. Modern rotary machines are lighter and quieter. They cause less skin trauma per pass. If pain is a major concern, ask your artist what machine they use and why.
How to Prepare for Your Appointment
Preparation isn’t glamorous, but it directly affects your pain experience. Walk in ready, and you’ll sit better. Walk in unprepared, and you’ll feel every single poke.
Hydration and Nutrition Tips
Drink water. Seriously. Hydrated skin accepts ink more easily, which means fewer passes and less irritation. Start hydrating the day before your appointment, not just the morning of.
Eat a real meal one to two hours before your session. Your body needs fuel to manage stress and pain. A solid combo of protein, complex carbs, and healthy fats keeps your blood sugar stable. Low blood sugar during a tattoo leads to dizziness, nausea, and a much lower pain threshold.
Avoid alcohol for at least 24 hours before your appointment. Alcohol thins your blood, which causes more bleeding and makes the artist’s job harder. Caffeine in moderation is fine, but don’t overdo it. Jittery nerves make it tough to sit still.
Skip blood-thinning supplements like aspirin, fish oil, and vitamin E for a day or two before. And get a full night’s sleep. Fatigue is a pain amplifier. Your nervous system handles stress better when it’s rested. Finally, wear the right clothes: loose, dark, and easy to pull away from the placement.
Using Digital Prep Links and Consent Forms
Good shops send you everything you need before you walk through the door. Consent forms, aftercare instructions, deposit confirmations, and reference images should all be handled ahead of time. This isn’t just about convenience. It’s about getting your head right.
When you’ve already reviewed your design, signed your consent form, and paid your deposit digitally, you arrive calm and focused. No scrambling at the front desk. No last-minute surprises. Platforms like Apprentice let artists send a single prep link that covers consent, deposits, and pre-appointment info in one flow. Clients show up ready, and artists can focus on the work instead of paperwork.
If your artist uses a digital booking system, fill everything out as soon as you get the link. Don’t wait until the morning of.
Managing Pain During and After Your Session
You’re in the chair. The buzzing starts. Here’s how to get through it and take care of yourself afterward.
Breathing Techniques and Distractions
Controlled breathing is the single most effective pain management tool you have. Slow, deep breaths activate your parasympathetic nervous system. That’s the “rest and digest” mode that counteracts your body’s fight-or-flight response.
Try box breathing: inhale for four counts, hold for four, exhale for four, hold for four. Repeat. It sounds simple because it is. But it works. Many artists notice an immediate difference in how clients sit when they focus on their breath.
Distractions help too. Bring headphones and a playlist or podcast. Some people watch shows on their phone. Others chat with their artist. Find what works for you and lean into it. Just don’t move around too much.
The numbing cream market has grown significantly, and topical numbing products are increasingly popular in 2026. But always check with your artist before applying anything. Some numbing agents change skin texture and affect ink absorption. Your artist’s preference matters here.
If you need a break during the session, say so. No good artist will judge you for it. A five-minute pause to stretch, drink water, and reset can make the difference between finishing strong and tapping out early.
Following Your Artist’s Aftercare Guide
The pain doesn’t end when the machine stops. Fresh tattoos are open wounds. The first 48 hours involve soreness, swelling, and heat. Think of it like a bad sunburn that you chose on purpose.
Your artist will give you specific aftercare instructions. Follow them exactly. Wash gently with unscented soap. Apply a thin layer of recommended ointment or moisturizer. Don’t scratch, pick, or soak it. Avoid direct sunlight.
Healing typically takes two to four weeks for the surface and up to three months for deeper layers. The itching phase around days three through seven is the worst for most people. It means your skin is healing. Resist the urge to scratch.
If your shop uses a platform like Apprentice, you might receive automated aftercare reminders and instructions directly to your phone. That kind of follow-up keeps you on track and protects the investment you just made in your skin.
The Bottom Line
Tattoos hurt. That’s not a bug; it’s part of the experience. But understanding pain by placement, preparing your body, and trusting your artist makes the whole thing manageable. The worst spots are survivable. The easy spots are almost enjoyable. And the result is permanent art on your skin.
Pick your placement with your eyes open. Hydrate. Eat. Breathe. And choose an artist who makes you feel comfortable enough to sit through the rough patches.
If you’re an artist looking to give your clients a smoother experience from booking to aftercare, Apprentice can help you handle the business side so you can focus on the craft. Get started free for 14 days and see the difference it makes in your shop.

Jason Howie
Founder & CEO
Jason Howie is the founder of Apprentice, passionate about empowering tattoo artists and shops with better tools to manage their business and serve their clients.